
Staying imprisoned at home for nearly 4 months, has had its share of benefits too. Hitherto untouched and untried recipes have been played with and at times, not just the easy versions but also their artisan counterparts have been conquered 😀
For example, all my life I had never even thought of baking bagels but now that the Sourdough (SD) madness has well and truly engulfed me (and most of the corona stricken world), I decided to bravely jump right into the Ring (yes pun intended), even bypassing the regular commercial yeast recipe.
So SD bagels it will be today and I am quite pleased to say that for a first time, it was hugely satisfying. Of course there will be more trials using whole grain flours in future but as always, I strongly advise that the first time with a new bread recipe should preferably be with maida aka All Purpose Flour (APF) or in this case, bread flour. A high gluten flour will enable better textured bagels. It is usually difficult in my city to obtain bread flour but fortunately I had some at hand.
Now allow this bagel to tantalize you to join me and take you through the process.
A bit of trivia – the husband played reluctant hand model since my usual victim (my son) was unavailable 😀

Bagel –
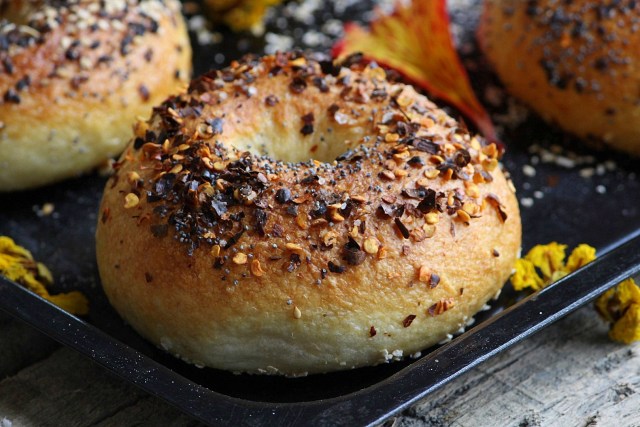
So what is a bagel? Loosely put, a bagel is a doughnut shaped bread that has its origins in the Jewish community that hailed from Poland. The dough is leavened with commercial yeast or sourdough and the ring shape is hand made. The fermented and shaped dough is boiled in water and then baked, thus making it different from other breads and also giving it its chewy texture.
The size is up to one’s preference but an average bagel is around 3.5 inches in diameter. Bagels also have various toppings and the one can be creative here and use whatever the heart desires. Some of the usual ingredients are sesame seeds, poppy seeds, zaatar, sea salt, chia, other nuts and seeds etc.
There are also dessert style bagels with cinnamon and raisin, chocolate chip, berries etc.
Bagels also come in different variants by way of ingredients and making process. What we are going to make here are called New York style bagels.
Bagels are slit into 2 and eaten like a sandwich with a spread of choice. One can go for cream cheese, butter, jam, avocado, egg, any spread etc … the options are limitless.


Making bagels –
There are several thousands of recipes on the internet and so many variants in terms of flavor and I was hunting for something that would feel right.
Also at this stage of my baking prowess, the most important factor for me was that it had to be a SD recipe. Ever since I have been stuck at home due to the corona lockdown, my regular commercial yeast has been told to observe social distancing from me and sit quietly in the fridge where it has been incarcerated for no real fault of its own 😀
So all the searching finally brought me to what looked liked a recipe suitable to my taste and I landed at the doorstep of Baked The Blog, a site that has some really nice work.
So a bit of twiddling and tweaking and adapting to my local flour and conditions, resulted in very pleasing New York Style Sourdough Bagels, especially for a for a first attempt.


Sourdough basics –
As always, if you are a SD beginner, I would recommend that you do not proceed before reading this post or else the rest of the post may not mean much to you.
I have explained what SD is about in the earlier posts on SD starter 1 and SD Starter 2 and before you can attempt any bake with SD, you will need to have a nice, enthusiastic starter ready.
Bagel Recipe –
Time –
Approximately 15 hours from start to finish.
Makes – 5 average sized bagels
For the dough –
1. Levain – 100 gm
2. Water – 170 gm
3. Honey – 20 gm (the original recipe called for maple syrup)
4. Bread flour – 375 gm You can also use Maida (APF)
5. Salt – 5 gm (1 teaspoon)
For coating the dough –
Oil – 1 – 2 teaspoon
For lining the pan –
Coarse oatmeal – enough to sprinkle
For Boiling –
Water – around 2 liters
Baking soda – 1 tablespoon
Organic Brown sugar – 1 tablespoon (or regular brown sugar)
For topping –
Black sesame seeds
White sesame seeds
Sea salt
Or any other herbs or condiments. Quantities as per choice.
Equipment that I used –
Kitchen Aid Bowl Lift Stand Mixer
Slotted spoon
Large steel vessel
Baking tray –
Method –
The timings given here are what I followed. Use these as guidelines and not actual timings because your ambient and ingredient conditions may differ.
Refresh your starter a day or two before baking, depending on how neglected it has been.
Prepare the Levain – About 3 hours before making the dough (3.30 pm) take 12 gm of the starter and feed it in a 1:4:4 ratio with 48 gm flour + 48 gm water. My starter doubles in 3 hours. We will need to use only 100 gm for this recipe.

Depending on your ambient conditions, start your levain process according to the time that you want to begin your kneading.
6.30 pm – Perform the float test to ensure that your levain is ready.
Drop a teaspoon of levain gently into a glass container of water. If the blob floats for a while and does not sink right away, the levain is ready to be used.

Add 100 gm levain, water and honey into a Kitchen Aid mixer bowl or regular bowl.
Using the dough hook, mix in the ingredients.
Add the salt and flour and knead for 8 – 10 minutes till the dough is smooth. Scrape down the sides from time to time as necessary.
Perform hand kneading if you do not have a stand mixer. Knead till the dough comes together as a soft, cohesive mass.
7 pm – Shape the dough into a ball and lightly oil the surface. Place it in the same mixer bowl (or any bowl) and cover with a lid and/or cling wrap.


Allow the dough to proof for 5 hours or till double.

At this point you can proceed with the next step of shaping the bagels OR you can place the covered bowl in the fridge. This can apparently remain for another 48 hours before the next step. It was 12 am (midnight) so I decided to refrigerate the dough. This overnight resting also helps in building up more flavor in the dough.
The next morning, line the baking tray with parchment paper and sprinkle oatmeal or any other coarse meal like cornmeal or rava (semolina).

9 am – Remove the dough from the fridge and rest it for 20 minutes.
Weigh the dough and divide equally into 5 balls.This will give you average sized bagels.

Place the balls on the parchment paper and cover with cling wrap and rest for another 20 minutes.
Now shape each ball by picking it up and piercing through the center on either side with the forefingers of both hands.
Spin the dough with the forefingers as the pivot until it shapes itself into a ring.
You can also shape the rings by rolling the ball into a long rope and then sticking the ends together to form a circle.
Place the ring back on the parchment paper.
Do the same with all the balls.

Cover again with the cling wrap and leave it in a warm place for the final rise, which took 1 hour in my case.


Preheat the oven to 230 deg c.
Now boil plenty of water (around 2 liters) in a vessel with a large mouth.
Add 1 tablespoon baking soda and 1 tablespoon brown sugar.

When the water is boiling, very gently pick up each bagel and drop it in the water. With the help of the slotted spoon, turn them over in 30 seconds. Boil on the other side for another 30 seconds.
You can put in one bagel at a time into the water or as many as you can comfortably handle. I did them one by one.
Remove with the spoon, drain well and place back on the parchment. Sprinkle more rava on the paper if needed, before placing the damp bagel.

If using egg, brush all the damp bagels with the beaten egg and sprinkle the toppings immediately. If not using egg, then sprinkle directly on the damp bagels.

Place the tray of bagels into the oven. Bake for 20 minutes or until the tops are nicely browned. Be aware that timings and temperatures vary from oven to oven.
Place them on a cooling rack and slice only when completely cold.


Bagels can be stored in a airtight box for 2 – 3 days at room temperature.
I usually slice and cling wrap and freeze the extra ones. They keep well for even 2 weeks (or maybe more). Try it out and let me know.


I hope you will successfully try this recipe and I would really appreciate if you leave your feedback in the Blog comments.
Also catch me on My Facebook, My Facebook page, My Twitter and My Instagram
Most every bagel recipe I’ve tried size it for a dozen bagels. Why go through all the work for only 5.
Hi Mark. Thank you for stopping by and leaving a comment. I got 6 bagels out of this recipe. I will edit my post.
The reason i made just 6 is that it was my first attempt and i did not want to take chances. Also, we hardly eat bagels in India but i really wanted to try them and so i made a small quantity
Carolineeee! These are definitely being made soooon.
One question…so if my sourdough starter is ready by tomorrow, I can simply use it as a levain? The last feed would be 1:4:4
Hey thanks Sheetal.
Yes if it rises to double in less than 6 hrs, then it should work. However, to obtain a more stable and sustainable starter in the long run, you have to continue feeding for a few more days.
Hi caroline. Firstly, thank you so much for such a detailed and well explained recipe and for alwayz replying to my doubts so promptly. I made bagels for the first time following this recipe and loved the outcome. My daughter keeps asking for them every other day now. Have already made these thrice now. Have also attempted your matcha sourdough loaf and it turned out soft and delish. Just tweaked the colours a wee bit but thts cauz i didnt have matcha. Awaiting your 100% sourdough wwf loaf recipe and also detailed pics on how you layered and shaped the colours of the matcha bread. Much love❤️
Hi Mona. Thank you so much for trying out the recipe and for your wonderful feedback. It makes me so happy to see that you are having fun with the bagels and matcha bread 😀 This stuff is addictive. Do keep trying out my recipes … I will be posting many more, including the wwf loaf. Thanks a ton for your comment. Much love to you too.