

Oh Sourdough (SD) crackers, how many are the ways that I love thee. And more importantly, how many are the ways that I can make thee 😀
Well the answer is apparently Infinite because these crackers can have that many variations in flavor, texture, ingredients etc etc.
I have so far only documented 3 of them on this blog, though I have made far many more variations. But then you know, at times I just go ahead and create things without the additional pressure of writing and photographing them. If you are a (bad) blogger like me, then you will totally understand that feeling 😎
Anyway, it has been quite a while since I obsessed over my crackers and these semolina SD ones have been very patiently waiting in my files to be unleashed on to the hungry world.
So let us set them free, while running the risk of enslaving ourselves to their wily charms!!!
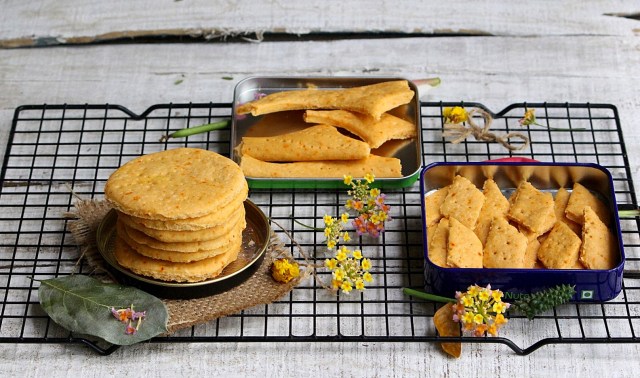
And on that dramatic note, I hereby present the Sourdough Semolina Crackers and subsequently the Sourdough Semolina Cracker Papdi Chaat and the Sourdough Semolina Puri, both of which were serendipitous outcomes of this cracker recipe.
A Cracker of a tale (or a tale of crackers) –
I had warned you here in this post on Sourdough Basic Crackers, that this stuff was dope and it could get you hooked for life. And that was proven in this post on SD Wholegrain Crackers and here again on Pure SD Crackers.
So yeah I am definitely crazy about them and baking them in several variants is my fool proof way of entertaining myself during this corona era, where I am stuck at home with no where to go other than the various rooms of my house 🙄
Well this lot of crackers is no different from the earlier ones in that they are equally easy to make and they are addictively delicious too.
I created them as I was putting together the ingredients to make my usual crackers but suddenly saw a forlorn box of fine semolina (wheat rava) that was lying neglected in my kitchen. Perceiving its baleful look, I was struck with guilt at having ignored its presence for months. Well I initially thought I would include in the crackers just to assuage its feelings but what resulted was such a successful outcome that it actually became the star ingredient in my show and now I buy it just for these crackers 😀
I will be documenting 2 variations here, one with maida (All Purpose Flour APF) and one with Whole Wheat Flour (WWF).

Also, another exciting outcome of this recipe was the extension into Sourdough Semolina Cracker Papdi Chaat and the Sourdough Semolina Puri, both these being some more of my crazy ideas with SD You can read about them on their individual blog posts.
Semolina –
Semolina refers to the coarse grits made from the endosperm of wheat. It is also known as Suji or Rava in India. While rava can also generically refer to the coarsely broken bits/grits of other grains, what we are using in this recipe is the wheat rava.
Rava is available in several variants depending on size and quality of wheat and what we are using here is the finest variety called Chiroti rava. The thicker rava will not give the same texture here.
SD discard –
Before moving ahead, I will need to explain a few things especially for those who are new to SD. As I mentioned in the earlier post on Sourdough, SD discard is the excess starter that one usually scraps while feeding the starter afresh. It is a wonderful ingredient to use, its name notwithstanding and I have never thrown any of it away.
Do not misled by its dull and gloopy countenance, for this substance adds great value to the flavor and texture of the products that it is used in. I have used it in rotis, naans, kulchas (all Indian flatbreads) and of course in crackers and I have many lofty plans for other future bakes too.

The Process –
Though the story is long :-D, the procedure is seriously simple and is mainly a mixing of the ingredients into a dough and rolling and cutting out into crackers.
Since in most of my bakes I usually experiment with refined (All Purpose Flour aka APF or Maida) and then go on to recreating the recipe with Whole Wheat Flour (WWF), I am going to list both recipes here, as mentioned earlier. The differences are minor and have more to do with the ability of the whole grain flour to absorb more liquid.
Also, remember that flours across the globe behave differently, so the aim is to use the quantity that gives you a firm but supple dough that does not crack while rolling.
The temperature, time etc of baking, depends on several factors and you will figure out what you have to do, as and when you do it. I will be documenting my recipe here but remember that you have to find your own sweet spot in your process and oven.
Recipe for Sourdough Semolina Crackers –
Time –
Approximately 30 minutes.
Makes – One 10×14 inch tray of cracker sheet depending on the thickness of the crackers.
Ingredients for Whole Wheat Sourdough Semolina Crackers –
1 – Whole wheat SD Discard or even freshly fed starter – 150 gm – See Notes
2 – Butter – 25 gm (see notes)
3 – Salt – 1 teaspoon
4 – Chilli flakes – 2 tsp – (optional)
5 – Chiroti Rava (fine semolina) – 100 gm (or enough to get a firm and non sticky but supple dough)
Ingredients for Maida (APF/refined flour) Sourdough Semolina Crackers –
1- Maida/APF SD Discard or even freshly fed starter – 150 gm – See Notes
2 – Butter – 25 gm (see notes)
3 – Salt – 1 teaspoon
4 – Chilli flakes – 2 tsp – (optional)
5 – Chiroti Rava (fine semolina) – 150 gm (or enough to get a firm and non sticky but supple dough)
Equipment that I used –
Aluminum baking tray – 10×14 inch
Silpat mat – 9.5×14 inch
(you can bake directly on the greased tray if you do not have a Silpat mat)
Method (the same method applies for both flours) –
You can take fresh starter or use your old discard and weigh it out into a bowl.
In another bowl, melt the butter. Add the salt and chilli flakes and mix everything thoroughly with a spatula. I prefer a Silicon spatula.
When the butter comes to room temperature, mix in the starter/discard thoroughly.
Add in the fine semolina a little by little and knead it into a dough. The dough should be firm but supple enough not to crack while rolling.
Cling wrap the dough and place in an airtight box and chill it overnight. This resting time is needed or else the semolina stays hard and this does not result in a smooth texture.
Take out the chilled dough and let it come to room temperature to make it easy to roll. I prefer rolling it chilled but you can go according to your convenience. Roll it into a rectangle directly on the Aluminum tray which should be greased or roll it on a Silicon mat. Roll as thin or thick as you like and try to go upto the edge of the tray or mat. The thinner it is, the quicker it will get crisp. If you roll it very thin, you may need to do more than 1 batch.

You can mark out crackers of any shape and size. I sometimes use a pizza cutter and at times I use the triangle that is used for decorating cake icing. This gives the crackers a nice serrated border.


When I am very lazy, I also cut out circles with a bottle cap. You can roll out individual circles if you wish. You can reroll the scraps or just leave them like I do, in a single sheet. In any case, they come apart easily after baking.

Rolling out circles is necessary when you are going to use the crackers to make Sourdough Papdi Chaat or deep fried Sourdough Puris instead of crackers.
Prick the crackers with a fork to prevent puffing up while baking.


Preheat the oven to 200 deg c.
Place the Silicon mat on the tray and place the tray in the oven. If you have directly rolled on the tray then you will place just the tray in the oven.

Keep an eye on the crackers. If your oven heats unevenly, flip the tray 180 deg after 10 min. Monitor the temperature. In my oven I keep it at 200 for around 20 minutes and then lower it to 180 deg c for another 10 minutes.
My oven has issues hence I need a higher temperature but remember that baking time and temperature is very dependent on how thin you have rolled, how crisp you want your crackers and of course how your oven generally behaves. So you have to find your own way here.
Sometimes after 30 min I leave the crackers in the oven for another 10 min after switching off. I leave the door ajar so that they can crisp up without moisture building up inside.
The crackers usually come apart on their own after baking and hence are easy to separate. If you have cut our circles, you can separate them from the scraps and also eat the scraps.


They can be stored in an airtight box for 2-3 weeks though I find this instruction hilarious because they never even last for a day in my house 😎
Notes –
A day before baking, remember to feed and build up your SD starter to the required weight. If you want a stronger sour flavor, then build up the starter even a week before baking. A fresher starter will have a milder flavor.
The amount of oil or butter you use, will affect the texture of your crackers. More fat gives a better texture. I use minimal oil and get a dryish texture which I am fine with.
Adjust the ingredients according to your preference. This is a very forgiving recipe and you can mess around liberally with it.
I hope you will successfully try this recipe and I would really appreciate if you leave your feedback in the Blog comments.
Also catch me on My Facebook, My Facebook page, My Twitter and My Instagram